Invisible Seams: A Yarn Technique for seaming row to row
Posted by Angelika's Yarn Store on Jan 11, 2019
How to do the Mattress Stitch
Learn to create an invisible seam when seaming up row to row knitting
There are many ways to seam our knitwear. This method is the most invisible and the most neat. Sometimes it is called the Mattress Stitch, used for seaming stockinet stitch rows to stockinet stitch rows. It takes a little bit ofpractice, but not much.
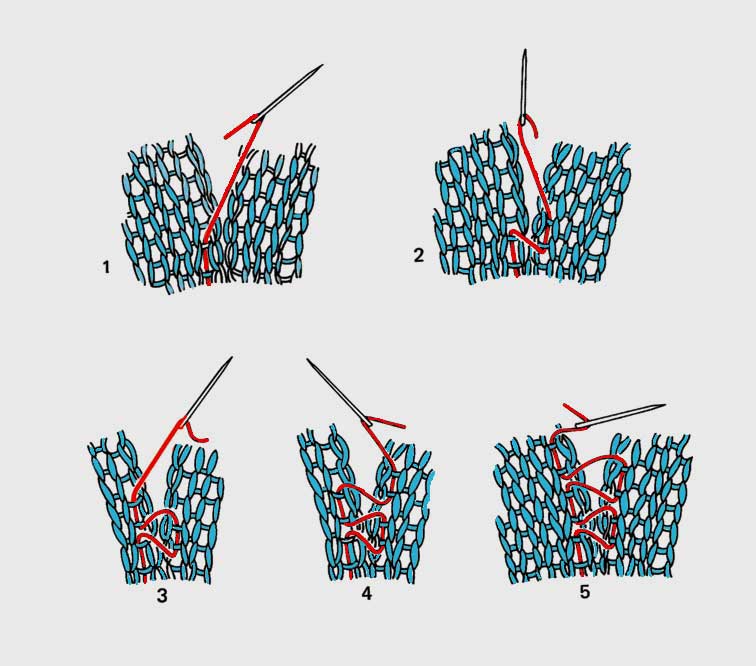
Pass tapestry needle from under the first bar
diagram #1: Insert the tapestry needle from top, under 2 bars and out the top.
diagram #2: Insert the tapestry needle on the other piece from the top, under 2 bars and back out the top.
diagram #3 Insert the tapestry needle from the top INTO THE SAME HOLE that seaming yarn came out of. Go under 2 bars and back out the top.
diagram #4: Insert the tapestry needle from the top INTO THE SAME HOLE that seaming yarn came out of. Go under 2 bars and back out the top.
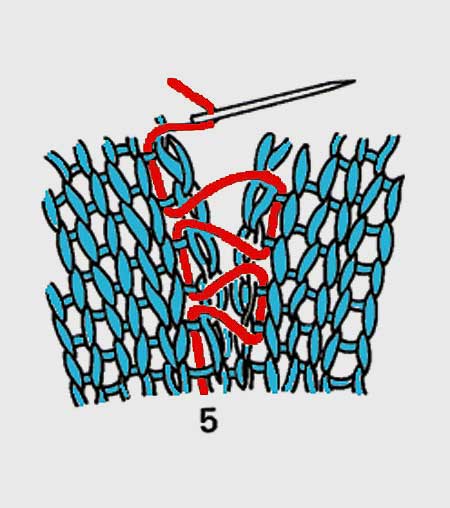
diagram #5: Continue to insert the tapestry needle into the same hole on the opposite piece that you came out of. Going under 2 bars and back out the top. I have enlarged diagram #5 to show the detail better.
SEAMING TIPS:
1-The bar is located between 2 stitches: the edge stitch and the 2nd stitch. If you are able to wire, pin and block, there is less of a curl on the edge. Therefore the edge stitch will be easy to see. I block all my pieces prior to seaming.
2-We have a salvage in sewing. And if I may borrow that term in this instance, there will be a salvage of 1 stitch on each piece. This is the case if you are careful and ARE stitching exactly between the 1st and 2nd stitch.
3-For a perfectly flawless seam it is an absolute must that each time you stitch you ALWAYS go into the same hole and out EXACTLY between the 1st and 2nd stitch.
4-I recommend knitting 2 stockinette swatches in worsted or heavy worsted weight smooth yarn. Steam block them so they behave for you while you learn this technique.
5-While you practice this, pull the two pieces apart where you have seamed. If the gap is pronounced, tug firmly on your seaming to tighten the stitches and close the gap. If you tighten too much, it will be obvious as the seam will pucker. But you will be surprised at how tight you need to go to make a flawless seam.
6-If your garment yarn is a boucle, dig through your stash and find a matching color in the same blend. When I have had absolutely nothing that would match, I have resorted to doubling or tripling strands of matching quilting thread.
7-I alter this a bit for my cuffs and hems. Instead of under 2 bars, I go under 1 bar each time. This helps to make sure that when my rib ends, it is aligned with the end of the rib on the 2nd piece. After that I will then switch to 2 bars.
8-Occasionally I will find that my pieces are not coming out even. In those cases you can ease the pieces together by going under 1 bar instead of 2 on the shorter piece. Sometimes this means I have to undo enough of a stretch so that I can "ease" that in smoothly, so that it does not show.
9-For Worsted weight and bulkier fabrics, I prefer to only pick up 1 bar each time. It seems to show more when picking up 2 bars on these larger stitch